Manage User Access
The Access Manager, a designated institutional administrator, can give their colleagues (and themselves) access to College Board’s Higher Education Reporting Portal.
Initial Access
The first time the designated Access Manager uses the Manage Access application, they need an access code. Access codes are not required for later sign-ins. If you haven't received your access code, email Higher Ed Reporting Support or call (866) 630-9305.
- Sign into your College Board account or create a new one by going to the professional dashboard.
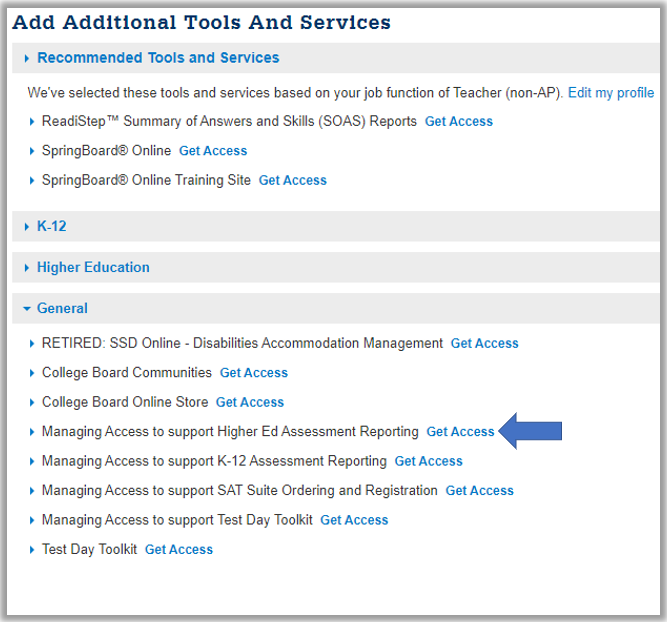
- Under "Add Additional Tools and Services" in the General section, click Get Access next to Managing Access to support Higher Ed Assessment Reporting.
- On the next page, enter your institution and access code. Your access code is only valid for the institution specified when you received the access code.
- After entering the access code, the Manage Access application will be in the My Tools and Services list.
Actions
You can use the Manage Access tool to take the following actions:
- View current users assigned to roles, revoke access for current users, and renew access by extending a user's access expiration date.
- Assign roles to existing users who already have College Board professional accounts and have indicated your institution as their employer.
- Invite users without College Board accounts, or users who did not indicate your institution as their employer (i.e., a vendor), to access your reports or data files. An email will be sent on your behalf to new users.
- Review outstanding invitations and resend or cancel them as needed.
Get detailed help for the Manage Access tool by clicking Help in the upper-right corner of the page.
Assigning Roles
Access Managers can assign multiple roles to any user; in fact, complete access to the reporting portal requires both the data files management role and the reporting detail role. Available roles:
- DAT for Assessment Reporting: Allows the Access Manager to grant colleagues access to the reporting portal using the Manage Access Tool and assign additional users to the Manage Access role. The Manage Access role (DAT for Assmt Reporting HE) allows for coverage if the primary Access Manager is unavailable or is leaving the organization. Access managers will also have access to the Preferences tab whey they can update the reporting preferences in their reporting portal.
- Assessment Reporting Data Files Management: Provides access to score data and essay batch files in the Downloads tab. This role is usually given to individuals in charge of uploading results into local data systems. Users with this role may be IT vendors hired by institutions, institution technology staff, or other institution staff. Assigned users will receive email notifications when new files are posted. This role doesn't include access to the other tabs of the reporting portal.
- Assessment Reporting Summary: Provides access to the SAT Trend Report tab. Additionally, provides access to the Exec. Summary tab provided the institution has purchased the EPS product and assigned access to that product as well. This role is limited to summary data only, with no access to individual student information. Summary reporting should be given to staff who don’t need student-level information but may need aggregate reporting. This role doesn’t include access to the Find a Student or Downloads tabs.
- Assessment Reporting Detail: Provides access to the Find a Student and Trend Report tabs. Additionally, provides access to the Exec. Summary tab provided the institution has purchased the EPS product and assigned access to that product as well. This also includes the ability to drill down to individual student score data and other personally identifying information. Detail reporting should be given to staff who benefit from seeing student-level results, such as admissions staff. This role doesn't include access to the Downloads tab.
You can set up and maintain unlimited users but be sure to manage accounts as people join and leave your organization.
Each role is independent. For example, you may assign data files access separately, or in conjunction with summary or detail reporting. If an individual is assigned both detail and summary reporting, detail reporting will preside.
Tips for Using the Managing Access Tool
Easiest way to grant access:
- Have the individual that needs access create their College Board professional account and make sure that they enter your institution in the “Where do you work?” field on the professional account form. If the individual already has a College Board professional account, have them review the “Where do you work?” field in their profile and update it to be the institution they need access to.
- The access manager should use the Managing Access tool and use the "Assign Roles" tab to grant access.
If using the "Invite Users" feature:
- The individual you're granting access to will receive an email notifying them that their institution’s access manager is giving them access to SAT Suite Ordering and Registration.
- To activate access, the individual must click one of two links provided in the invite email. IMPORTANT: If the individual is accessing this email using Microsoft Outlook, right click on the link and copy it and paste it into your browser, instead of clicking on it. Once they click one of the links, they have up to three minutes to complete the invite process outlined below. If they don't, their access will be revoked and the access manager will need to send a new invite email using the Managing Access tool.
- If the individual does not have a College Board professional account, they must click the “create one here” link and create their College Board professional account before getting access.
- If the individual already has a College Board professional account, they must click the “click here to add access” link and log in to their College Board professional account before getting access.
- IMPORTANT: The individual that needs access must use one of the links in their invite email to activate their access. They must NOT create or log in to their College Board professional account prior to clicking one of the links in the invite email. If they do, they will get an error message and their access manager will have to resend the invite email in the Managing Access tool.